
Coroutine
먼저 Unity에서 Update() 메소드는 매 프레임마다 호출해 변화를 일으키기 위해 사용하고는 한다.
60fps라면 1초에 60번 호출이 된다.
그런데 만일, 5초동안 지연을 시켜야하는 상황이 발생 한다면 어떻게 될까?
단순하게 Update() 메소드를 300번 (5 * 60) 호출하면 될 것이다.
하지만 이러한 딜레이가 발생하는 상황을 모두 Update() 구문에 정의하게 되면
사용자의 환경에 따라 프레임 드랍을 발생시킬 수 있다.
이를 개선하기 위해 Coroutine을 사용하면 Update() 함수를 굳이 300번이나 호출하지 않고도
시간을 효율적으로 지연시킬 수 있다.
Coroutine 사용 예제
먼저 Coroutine을 사용하지 않은 예제를 살펴보겠다.
using UnityEngine;
using System.Collections.Generic;
using System.Collections;
using Unity.VisualScripting;


public class Corutine : MonoBehaviour
{
    public bool isDelay;
    public float delayTime = 5.0f;
    public float accTime;

    // Update is called once per frame
    void Update()
    {
        if (Input.GetKeyDown(KeyCode.Space))
        {
            if (isDelay == false)
            {
                isDelay = true;
                Debug.Log("키 다운 입력 확인");
            }
            else
            {
                Debug.Log("재사용 대기시간 : " + (5 - (int)accTime) + "초");
            }
        }
        if (isDelay)
        {
            accTime += Time.deltaTime;
            if(accTime >= delayTime)
            {
                accTime = 0.0f;
                isDelay = false;
            }
        }
    }
}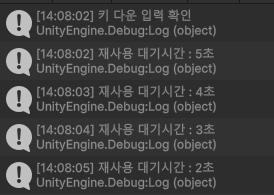
Space를 누르고, isDelay가 false일 때, 문구를 출력하고 true로 변경
true일 경우 accTime에 시간을 추가하여 5초 이상이 될 때 다시 false로 변경한다.
이 코드를 Coroutine을 사용해 수정해보겠다.
using UnityEngine;
using System.Collections.Generic;
using System.Collections;
using Unity.VisualScripting;


public class Corutine : MonoBehaviour
{
    public bool isDelay;
    public float delayTime = 5.0f;
    public float accTime;

    // Update is called once per frame
    void Update()
    {
        if (Input.GetKeyDown(KeyCode.Space))
        {
            if (isDelay == false)
            {
                isDelay = true;
                Debug.Log("키 다운 입력 확인");
                StartCoroutine(Click());
            }
            else
            {
                Debug.Log("재사용 대기시간이 끝나지 않았습니다.");
            }
        }
    }

    IEnumerator Click()
    {
        yield return new WaitForSeconds(5.0f);
        isDelay = false;
    }
}동작 결과는 동일하다
Coroutine 선언 IEnumerator
Coroutine의 선언은 반환형을 IEnumerator로 설정한다.
그리고 일반적인 함수와 달리 반환 시 return이 아닌 yield return으로 돌려주어야 한다.
yield return 뒤에는 반환 시간을 명시하는데, 명시한 반환 시간 만큼 동작을 중지시키고
시간이 지나면 다음 줄 부터 다시 Coroutine이 동작한다.
I. null : 1프레임 만큼 코드 동작을 중지한다.
II. new WaitForSeconds(s) : s초 만큼 동작을 중지한다.
Coroutine 실행 StartCoroutine()
Coroutine의 실행 방법은 일반 함수와는 달리, StartCoroutine() 메소드를 이용하여
괄호 안에 Coroutine 이름을 넣어야 한다.
혹은 아래와 같이 이름으로도 실행이 가능하다.
StartCoroutine("Click")
Coroutine 중지
다음은 Coroutine을 중지하는 방법이다.
아래는 1초마다 로그를 출력하고, Space 키를 누르면 Coroutine이 중지되는 예제이다.
using UnityEngine;
using System.Collections.Generic;
using System.Collections;
using Unity.VisualScripting;


public class Corutine : MonoBehaviour
{
    public bool isDelay;
    public float delayTime = 5.0f;
    public float accTime;

     void Start()
     {
        StartCoroutine("Timer");
     }
    void Update()
    {
        if (Input.GetKeyDown(KeyCode.Space))
        {
            {
                StopCoroutine("Timer");
                Debug.Log("타이머를 종료합니다.");
            }
        }
    }

    IEnumerator Timer()
    {
        int i = 1;
        while(true)
        {
            yield return new WaitForSeconds(1.0f);
            Debug.Log(i + "초");
            i++;
        }

    }
}
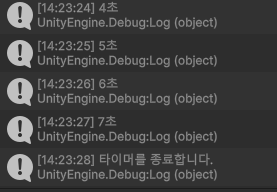
이처럼 Coroutine은 StopCoroutine()/StopAllCoroutines() 함수로 중지시킬 수 있다.
StopCoroutine() 함수는 해당하는 Coroutine만 중지시키고, StopAllCoroutines() 함수는 모든 Coroutine을 중지시킨다.
yield return VS yield break
마지막으로 yield return 과 yield break의 차이에 대해 알아보겠다.
yield return은 지정한 시간만큼 대기하는 키워드라고 설명하였는데,
이와 달리 yield break 문은 해당 키워드를 만나자 마자 Coroutine을 빠져나온다.
using UnityEngine;
using System.Collections.Generic;
using System.Collections;
using Unity.VisualScripting;


public class Corutine : MonoBehaviour
{
    public bool isDelay;
    public float delayTime = 5.0f;
    public float accTime;

     void Start()
     {
        StartCoroutine("Timer");
     }
    void Update()
    {
        if (Input.GetKeyDown(KeyCode.Space))
        {
            {
                StartCoroutine(Return());
                StartCoroutine(Break());
            }
        }
    }

    IEnumerator Return()
    {
        Debug.Log("Return() 1");
        yield return null;
        Debug.Log("Return() 2");

    }
    IEnumerator Break()
    {
        Debug.Log("Break() 1");
        yield break;
        Debug.Log("Break() 2");
    }
}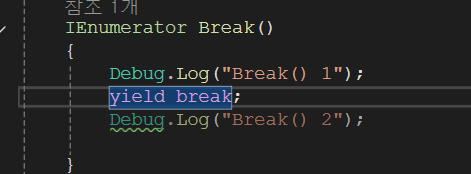
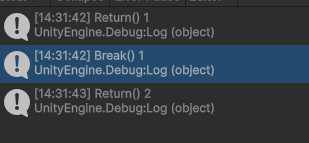
yield break; 아래의 Debug.Log("Break() 2")에 접근하지 못해 Coroutine이 끝났음을 확인 가능합니다.
'Unity' 카테고리의 다른 글
| [Unity] Top View 플레이어 이동 구현 (0) | 2025.03.10 |
|---|